Cinder Block Aquarium Stand: DIY Guide to Building a Sturdy and Stylish Stand
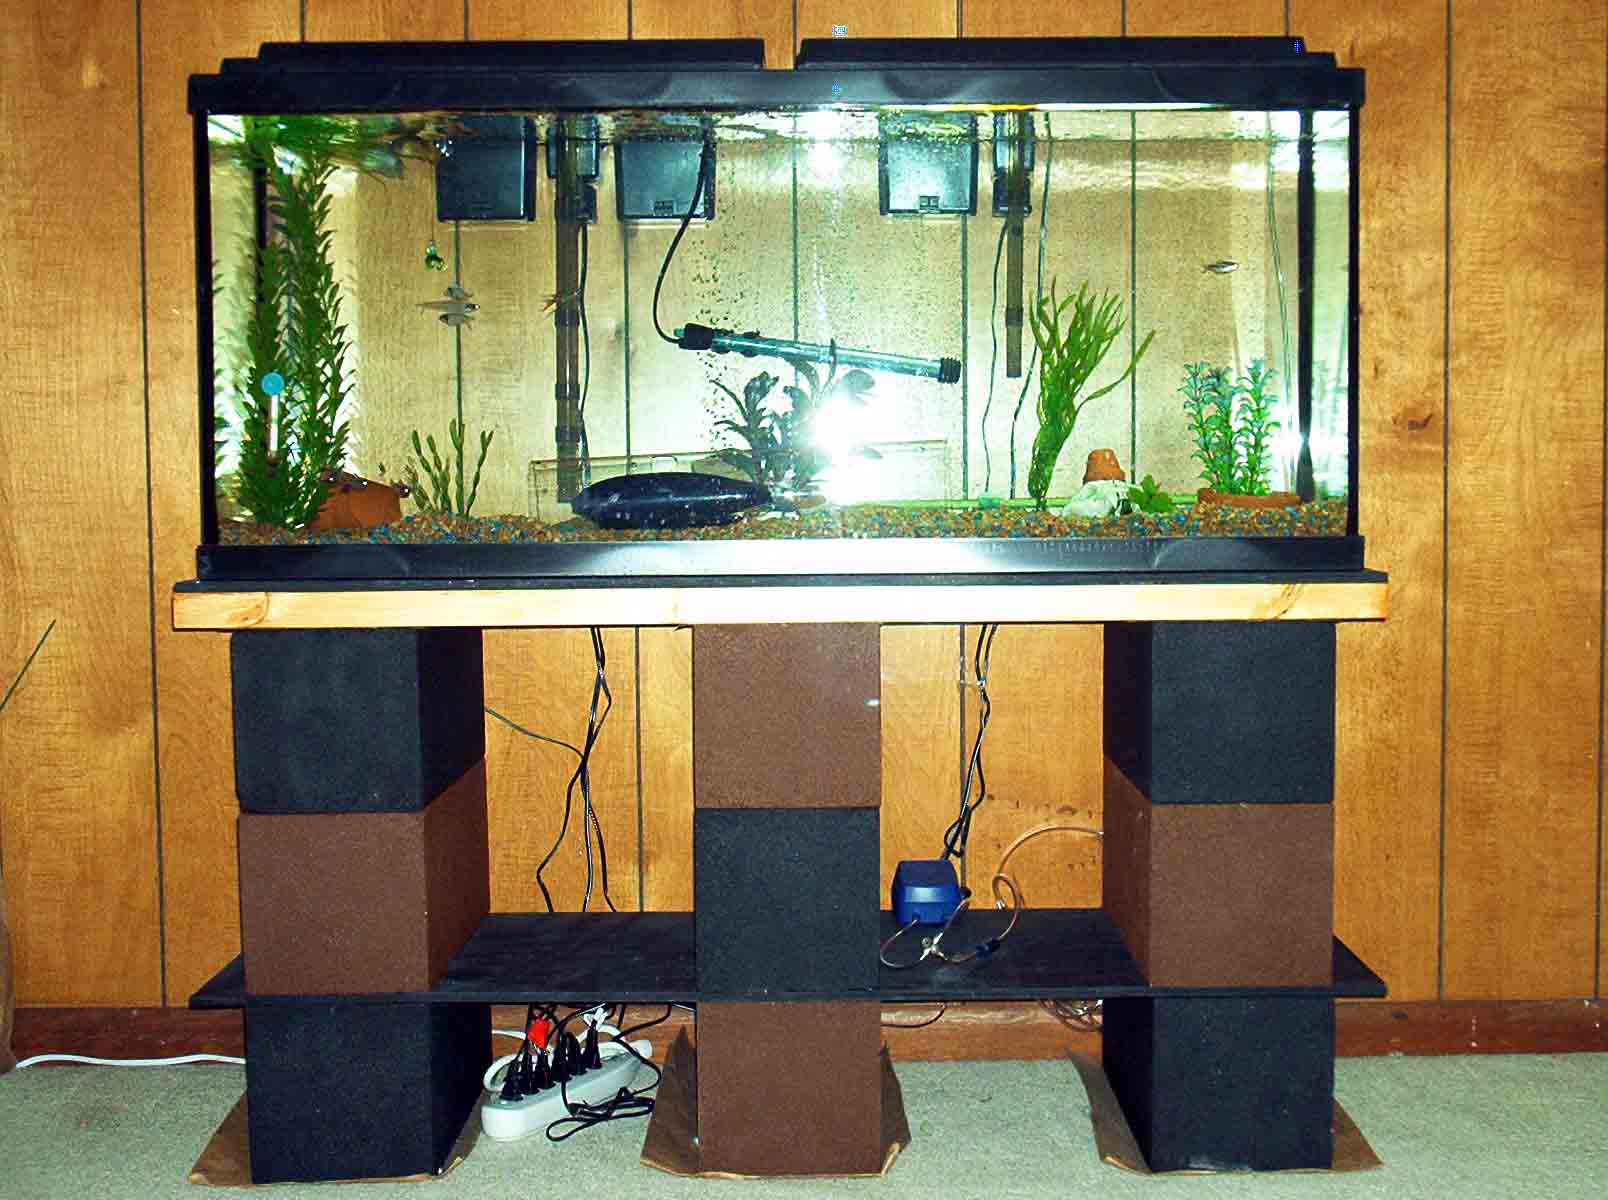
A cinder block aquarium stand is a sturdy and affordable option for supporting an aquarium. This type of stand is made by stacking cinder blocks and placing a solid surface on top to create a level and secure platform for the tank.
Cinder block stands offer great versatility as they can be customized to fit various tank sizes and styles. Additionally, they can be easily adjusted or expanded if needed. Many diy enthusiasts find cinder block aquarium stands to be a practical, cost-effective, and easily customizable solution for displaying their aquariums.
Not only are they functional, but they also add a unique and industrial aesthetic to any living space. So, if you’re looking for an affordable and versatile aquarium stand, consider utilizing cinder blocks for your project.

Credit: www.thisoldhouse.com
Planning And Measurements
Determining the right size for your aquarium stand:
- Measure the dimensions of your aquarium: Start by measuring the length, width, and height of your aquarium. This will help you determine the appropriate size for your stand. Consider leaving some extra space around the aquarium for accessories and maintenance.
- Consider the weight of the aquarium: Different aquariums have different weights based on their size and the materials used. Ensure that the stand you choose can support the weight of your aquarium. Take into account the weight of the water, the substrate, decorations, and any additional equipment.
- Research standard aquarium stand sizes: Look up standard sizes for aquarium stands that are suitable for your aquarium dimensions. This will give you a good starting point to work with.
- Customize the measurements if needed: If there are no standard stands that fit your aquarium perfectly, you may need to customize the measurements. However, be cautious and ensure that the stand is sturdy enough to support the weight.
Gathering the necessary tools and materials:
- Measuring tape: A measuring tape is essential for accurately measuring the dimensions of your aquarium and ensuring proper fit.
- Carpenter’s square: A carpenter’s square helps ensure accurate right angles during assembly.
- Level: A level is necessary to ensure that your stand is perfectly level, which is crucial for the stability of your aquarium.
- Drill: A drill will be needed for securing the pieces together and creating pilot holes if necessary.
- Screws/nails: Depending on the type of stand you are building, you may require screws or nails to secure the pieces together.
- Cinder blocks: Cinder blocks are a popular choice for building aquarium stands. Make sure to calculate the number of blocks required based on your measurements.
- Plywood or mdf: You will need a sturdy surface such as plywood or medium-density fiberboard (mdf) to place on top of the cinder blocks as the base for your aquarium.
Ensuring proper weight distribution:
- Distribute the weight evenly: When setting up your aquarium stand, it is crucial to distribute the weight evenly across all the blocks. This ensures stability and minimizes the risk of cracks or failure.
- Use leveling shims if needed: If your floor is uneven, you may need to use leveling shims to stabilize the stand and ensure the aquarium remains level. Insert the shims between the cinder blocks and the plywood/mdf base as necessary.
- Regularly check for signs of stress: Keep an eye out for any signs of stress on the cinder blocks or the stand itself, such as cracking or sagging. If you notice any issues, make sure to reinforce or replace the affected parts promptly.
Remember, proper planning and measurements are essential to ensure the safety and longevity of your aquarium stand. Put in the effort upfront, and you’ll have a sturdy, functional, and visually appealing stand to showcase your aquatic masterpiece.
Building The Foundation
When it comes to setting up a cinder block aquarium stand, building a solid foundation is crucial for the stability and longevity of the structure. In this section, we’ll discuss the key steps involved in creating a secure base for your aquarium.
Preparing The Area For The Cinder Blocks:
Before you begin assembling the cinder blocks, it’s important to prepare the designated area properly. Here are the steps you should follow:
- Clear the space: Remove any debris, rocks, or plants from the area where you plan to set up the stand.
- Level the ground: Use a shovel or a rake to ensure that the ground is level. This step is crucial for the stability of the stand.
- Measure the dimensions: Take precise measurements of the area to determine the placement and number of cinder blocks needed.
Creating A Level Base For Stability:
The next crucial step is to create a level base for your cinder block aquarium stand. Here’s how you can achieve it:
- Lay a level foundation: Start by placing an even layer of gravel or sand on the ground. This layer will help distribute the weight of the stand more evenly.
- Use a leveler: As you stack the cinder blocks, make sure to use a leveler to check for any discrepancies. Adjust the blocks as necessary to achieve a level base.
Securing The Cinder Blocks In Place:
To ensure the stability of your cinder block aquarium stand, securing the blocks in place is essential. Here’s what you need to do:
- Apply adhesive: Use a construction adhesive specifically designed for outdoor use to secure the cinder blocks together. Apply the adhesive between each block to create a strong bond.
- Add reinforcement: For added stability, consider inserting rebar through the holes in the cinder blocks and securing them with concrete.
- Double-check the alignment: Once all the blocks are in place, carefully check the alignment and adjust if necessary. Ensuring that the blocks are level and properly aligned will help prevent any unwanted shifts or collapses.
Remember, building a sturdy foundation is crucial for maintaining the structural integrity of your cinder block aquarium stand. By following these steps, you’ll have a solid base that can support your aquarium’s weight and provide a safe environment for your aquatic pets.
Constructing The Frame
Building The Base Using Cinder Blocks And Wooden Boards
A strong and stable frame is essential for supporting the weight of your aquarium and ensuring its safety. When it comes to constructing the frame, you can rely on the combination of cinder blocks and wooden boards to get the job done effectively.
Here’s how you can build a solid base using these materials:
- Begin by determining the number of cinder blocks you’ll need based on the size and weight of your aquarium. It’s crucial to choose blocks that are sturdy and in good condition.
- Place the cinder blocks on a level surface, ensuring they are evenly spaced to distribute the weight of the aquarium uniformly. This will prevent any potential stress points.
- Once the cinder blocks are in position, lay the wooden boards across the top. These boards will provide a stable surface for your aquarium to rest upon.
- Make sure the wooden boards are cut to the appropriate size, allowing them to cover the entire top of the cinder blocks. This will prevent any instability or wobbling.
- To further enhance the stability and strength of the base, you can reinforce it by adding support beams.
Adding Support Beams For Added Strength
Support beams are an excellent addition to your cinder block aquarium stand. They provide additional strength and help distribute the weight of the aquarium more evenly, reducing the risk of any structural issues. Here’s what you need to know about adding support beams:
- Measure the distance between the cinder blocks to determine the appropriate length for your support beams. You can use wooden beams or metal bars, depending on your preference and the weight of your aquarium.
- Place the support beams perpendicular to the wooden boards, directly on top of the cinder blocks. Ensure they are centered and parallel to each other.
- Secure the support beams in place using appropriate hardware, such as brackets or screws. This will prevent any movement or shifting.
- Consider adding multiple support beams across the length of the stand for optimal strength and stability. The number of beams required will depend on the size and weight of your aquarium.
Securing The Frame Together
Now that the cinder blocks, wooden boards, and support beams are in place, it’s crucial to secure the frame together to ensure it remains sturdy and reliable. Here’s how to go about it:
- Use heavy-duty screws or brackets to attach the wooden boards to the cinder blocks. This will prevent any shifting or movement of the individual components.
- Make sure to fasten the support beams securely to the wooden boards and the cinder blocks. This will provide maximum stability and prevent any sagging or bending.
- Regularly inspect the frame for any signs of wear or damage and make any necessary repairs or reinforcements promptly.
Constructing the frame of your cinder block aquarium stand is a critical step in creating a strong and secure foundation for your aquarium. Building a base using cinder blocks and wooden boards, along with adding support beams, ensures the stability and durability necessary to protect your aquatic pets and the surrounding environment.
With a well-constructed frame, you can enjoy your aquarium worry-free, knowing it is in safe hands.
Adding Shelving And Storage
Incorporating Shelves And Compartments For Storage
When it comes to designing a cinder block aquarium stand, incorporating shelves and compartments for storage is essential. Here are some key points to keep in mind:
- Utilize the vertical space: Adding shelves allows you to maximize the storage capacity of your aquarium stand. Take advantage of the vertical space by installing multiple shelves, providing ample room for storing equipment, supplies, and decorative items.
- Consider the size and quantity: Before designing your shelves, consider the size and quantity of items you need to store. Opt for shelves that can accommodate various sizes of fish tanks and equipment, ensuring easy access to everything you need.
- Create compartments for organization: To keep your aquarium stand tidy and organized, consider adding compartments within the shelves. This will help separate different items and prevent clutter. You can use dividers or even incorporate open cubbies for quick access to frequently used supplies.
- Optimize space with adjustable shelves: Adjustable shelves offer flexibility, allowing you to adapt the storage space to your changing needs. This feature is especially helpful if you plan on expanding your collection or altering the setup of your aquarium.
- Incorporate cabinet doors or curtains: While shelves are functional, they may not always be aesthetically pleasing. Consider adding cabinet doors or curtains to hide the storage area and create a clean and cohesive look. This will also prevent dust and debris from accumulating on your stored items.
Designing The Stand For Functionality And Aesthetic Appeal
Designing your cinder block aquarium stand goes beyond just functionality – it’s also about creating an appealing aesthetic. Here are some key points to consider:
- Choose a cohesive design: Select materials and colors that complement the overall theme of your home or aquarium setup. A cohesive design will ensure that your aquarium stand seamlessly integrates into the space, enhancing its visual appeal.
- Incorporate decorative elements: Picking out decorative elements, such as trim, molding, or paint, can add style and character to your stand. Consider adding these details to create a custom look that reflects your personal taste and style.
- Ensure stability and weight distribution: While aesthetics are important, safety should be a priority. Make sure your stand is stable and can support the weight of your aquarium. Distribute the weight evenly throughout the stand, ensuring proper load-bearing capacity for both the stand and the shelves.
- Hide unsightly equipment: Fish tanks come with various equipment such as filters, cords, and air pumps. To maintain a clean and organized appearance, incorporate features that can conceal or hide these unsightly elements. This can include cabinet doors or panels designed to accommodate equipment.
- Pay attention to details: Adding small details such as lighting fixtures or decorative accents can elevate the overall aesthetic appeal of your stand. Consider incorporating led strip lights or decorative knobs to enhance the visual appeal of your aquarium stand.
By incorporating shelves and compartments for storage while designing your cinder block aquarium stand, you can achieve both functionality and aesthetic appeal. With proper planning and attention to detail, your stand will become a practical and visually pleasing addition to your aquarium setup.
Finishing Touches
Sanding And Painting The Cinder Blocks For A Polished Look
If you want to give your cinder block aquarium stand a polished and professional appearance, sanding and painting the cinder blocks is the way to go. Here are the key steps to follow:
- Start by inspecting the cinder blocks for any rough or uneven surfaces. Use sandpaper to smooth out any imperfections, ensuring a smooth and even surface.
- Once the blocks are adequately sanded, wipe them down with a clean cloth to remove any dust or debris. This step is crucial for ensuring proper paint adhesion.
- Choose a paint color that complements your aquarium and the overall aesthetic of your space. Consider using a waterproof paint to protect the cinder blocks from moisture.
- Apply a coat of primer to the cinder blocks before painting to ensure proper coverage and adhesion of the paint. Let the primer dry completely according to the manufacturer’s instructions.
- Once the primer is dry, apply a thin and even coat of paint using a brush or roller. Allow the first coat to dry completely before applying additional coats if necessary. Multiple thin coats will yield better results than one thick coat.
- As you paint, pay attention to any hard-to-reach areas or corners to ensure complete coverage. Take your time and be thorough to achieve a polished and professional finish.
- After the final coat of paint is dry, inspect the cinder blocks for any touch-ups or uneven spots. Use a fine-tip brush or small roller to make any necessary corrections.
- Finally, let the paint cure completely before placing any weight or objects on the newly painted cinder blocks. This will ensure that the paint job remains intact and doesn’t get scratched or damaged.
- Keep in mind that regular maintenance may be required to keep the painted cinder blocks looking their best. Touch up any chipped or faded areas as needed to maintain the polished appearance.
Sealing The Wood For Durability And Water Resistance
To enhance the durability and water resistance of your cinder block aquarium stand, it’s essential to seal the wood properly. Follow these steps for effective sealing:
- Before sealing, ensure that the wood is clean and free from any dust or debris. Use a damp cloth or soft brush to remove any dirt or loose particles.
- Choose a suitable wood sealer or waterproofing product that is specifically designed for outdoor or aquatic use. Look for one that provides both water resistance and uv protection.
- Apply the sealer evenly to all wood surfaces of the aquarium stand using a brush or roller. Pay extra attention to areas that may be more prone to moisture exposure, such as the bottom of the stand or joints.
- Allow the sealer to penetrate the wood for the recommended time specified by the manufacturer. This will ensure that the wood absorbs the sealant properly.
- After the recommended soaking time, remove any excess sealer with a clean cloth or paper towel. Be careful not to leave any streaks or pools of sealer on the wood surface.
- Let the sealer dry completely according to the manufacturer’s instructions. This may take anywhere from a few hours to a full day, depending on the product used.
- For optimal protection, apply a second coat of sealer following the same steps as before. This will create an additional barrier against water damage and extend the lifespan of the wood.
- Regularly inspect the sealed wood for any signs of wear or damage. If necessary, reapply the sealer to maintain its effectiveness and prolong the life of your cinder block aquarium stand.
Installing A Decorative Backing Or Side Panel
Adding a decorative backing or side panel to your cinder block aquarium stand not only enhances its appearance but also provides additional functionality. Here’s what you need to know about the installation process:
- Measure the dimensions of the area where you want to install the decorative panel. This will help you determine the appropriate size and materials needed.
- Choose a material that is durable, moisture-resistant, and suitable for aquarium use. Common options include plywood, acrylic, or pvc sheets. Consider the overall design theme of your space when selecting the material.
- Cut the chosen material to the desired dimensions using a saw or appropriate cutting tool. Ensure that the edges are smooth and even to achieve a professional finish.
- Attach the decorative panel to the cinder blocks using appropriate fasteners such as screws or brackets. Make sure the panel is securely fastened to provide stability and support for your aquarium.
- Optionally, you can further enhance the aesthetic appeal by painting or staining the decorative panel to match your aquarium stand or room decor.
- Regularly check the installed panel for any signs of damage or wear. Replace or repair it as needed to maintain the overall appearance and functionality of your cinder block aquarium stand.
Remember, the finishing touches make all the difference in transforming your cinder block aquarium stand from ordinary to extraordinary. By sanding and painting the cinder blocks, sealing the wood, and adding a decorative backing or side panel, you can achieve a polished and visually appealing setup for your aquarium.
Setting Up The Aquarium
Prepare the tank for placement on the stand:
- Start by thoroughly cleaning the tank with warm water. Ensure there is no residue or dirt left from the manufacturing process.
- Inspect the tank for any cracks or defects. It’s essential to have a structurally sound tank before placing it on the stand.
- Attach the background or film to the back of the tank if desired. This will add depth and visual appeal to your aquarium.
Ensuring proper alignment and stability:
- Place the cinder block stand in the desired location. Make sure it is on a level surface to prevent any wobbling or imbalance.
- Carefully lift the tank and place it on the stand. Ensure the tank is centered and straight. It should fit securely on the stand without any overhang.
- Use a level to double-check the alignment both horizontally and vertically. Adjust the positioning of the tank if necessary to achieve proper stability.
Adding the necessary equipment and accessories:
- Install the aquarium filter according to the manufacturer’s instructions. This is crucial for maintaining water quality and keeping your fish healthy.
- Set up the aquarium heater to maintain a consistent temperature. Different fish species require specific temperature ranges, so ensure you choose the appropriate setting.
- Place substrate, such as gravel or sand, on the bottom of the tank. This not only enhances the aesthetic appeal but also provides a natural habitat for aquatic plants and invertebrates.
- Introduce decorations, such as rocks, driftwood, or artificial plants, to create a visually pleasing environment for your fish. Remember to choose decorations that are safe for aquarium use.
- Add water conditioner to the tank to remove any chlorine or other harmful chemicals from tap water. Follow the product instructions for the correct dosage.
- Allow the tank to cycle for a few days to establish a healthy bacterial population. This will create a biological filter that breaks down waste and maintains the aquarium’s ecosystem.
- Finally, introduce your fish slowly, allowing them time to acclimate to the new environment. Monitor their behavior and water parameters to ensure their well-being.
Setting up an aquarium requires careful planning and attention to detail. By following these steps, you can create a secure and thriving environment for your aquatic pets. Remember to research the specific needs of your fish species and provide the necessary care to ensure their long-term health and happiness.
Maintenance And Safety Tips
Cinder Block Aquarium Stand
Maintaining and keeping your aquarium stand safe is crucial to ensure the well-being of your aquatic friends. Regular maintenance, safety precautions, and troubleshooting common issues are essential aspects of caring for your cinder block aquarium stand. In this section, we will cover these points in detail.
Regular Maintenance Checklist For The Stand
To prolong the life of your cinder block aquarium stand and keep it in optimal condition, follow this maintenance checklist:
- Check for any signs of wear and tear, such as cracks or loose blocks. Replace damaged blocks immediately.
- Clean the stand regularly using a damp cloth or gentle cleaning solution. Avoid using abrasive chemicals that can damage the materials.
- Inspect the stand’s stability by ensuring all blocks are properly aligned and no shifting has occurred.
- Regularly check the weight distribution of the aquarium and make any necessary adjustments to maintain balance.
- Monitor the condition of the supporting plywood or other materials used on the top surface of the stand. Replace if it becomes weakened or damaged.
Safety Precautions To Prevent Accidents Or Damage
To ensure the safety of your aquarium, as well as yourself and your surroundings, follow these safety precautions:
- Place the cinder block aquarium stand on a level, sturdy surface to avoid any wobbling or instability.
- Use proper lifting techniques when assembling the stand or moving heavy aquarium equipment to prevent strain or injury.
- Securely attach the aquarium to the stand using appropriate hardware, ensuring it cannot accidentally fall or be knocked off.
- Keep electrical cords and wires properly organized and away from water to minimize the risk of electrical hazards.
- Regularly inspect the area around the stand to ensure there are no water leaks or spills that could damage the stand or create slip hazards.
Troubleshooting Common Issues
Even with proper maintenance and precautions, some common issues may arise. Here are some troubleshooting tips:
- If you notice any signs of block movement or instability, reinforce the stand by adding additional support using extra blocks or steel braces.
- Address any moisture-related issues promptly to prevent the deterioration of the cinder blocks or any potential water damage to surrounding areas.
- If the stand appears uneven, use a leveling tool to identify any problem areas and adjust accordingly.
- If cracks develop in the blocks, promptly replace them to prevent further damage and ensure the stability of the stand.
- Keep a close eye on the aquarium equipment, such as filters or heaters, to ensure they are functioning properly and not causing any undue stress on the stand.
Remember, regular maintenance, safety precautions, and addressing issues promptly are key to ensuring the longevity and safety of your cinder block aquarium stand. By following these tips and guidelines, you can create a stable and secure environment for your aquatic pets.
Frequently Asked Questions On Cinder Block Aquarium Stand
How To Build A Cinder Block Aquarium Stand?
Building a cinder block aquarium stand requires measuring, stacking cinder blocks, adding plywood, and securing the tank.
Are Cinder Blocks Strong Enough For An Aquarium Stand?
Cinder blocks are strong enough for an aquarium stand, as they are sturdy and provide stable support.
What Are The Benefits Of Using A Cinder Block Aquarium Stand?
Using a cinder block aquarium stand saves money, allows for customizability, and provides a strong foundation.
Conclusion
To sum up, a cinder block aquarium stand is a practical and accessible solution for those looking to create a sturdy and budget-friendly foundation for their fish tanks. By utilizing inexpensive materials and easy-to-follow steps, even beginners can build a customized stand that meets their needs.
Not only does it provide stability and support, but it also adds a touch of rustic charm to any room. The versatility of cinder blocks allows for adjustments in size and design, ensuring a perfect fit for any aquarium. With proper care and maintenance, this diy project guarantees a lasting and resilient stand that will keep your aquatic pets safe and secure.
So, why spend a fortune on a store-bought stand when you have the opportunity to create one yourself? Embrace your creativity, save money, and embark on this exciting diy project today!
